

Views: 0 Author: Site Editor Publish Time: 2025-09-28 Origin: Site


Hydraulic butt fusion creates joints as strong as the pipe itself. For beginners, this process ensures leak-free, durable connections. With hydraulic butt fusion machines, welding becomes safer and easier. In this guide, you'll learn the essential steps to start confidently.
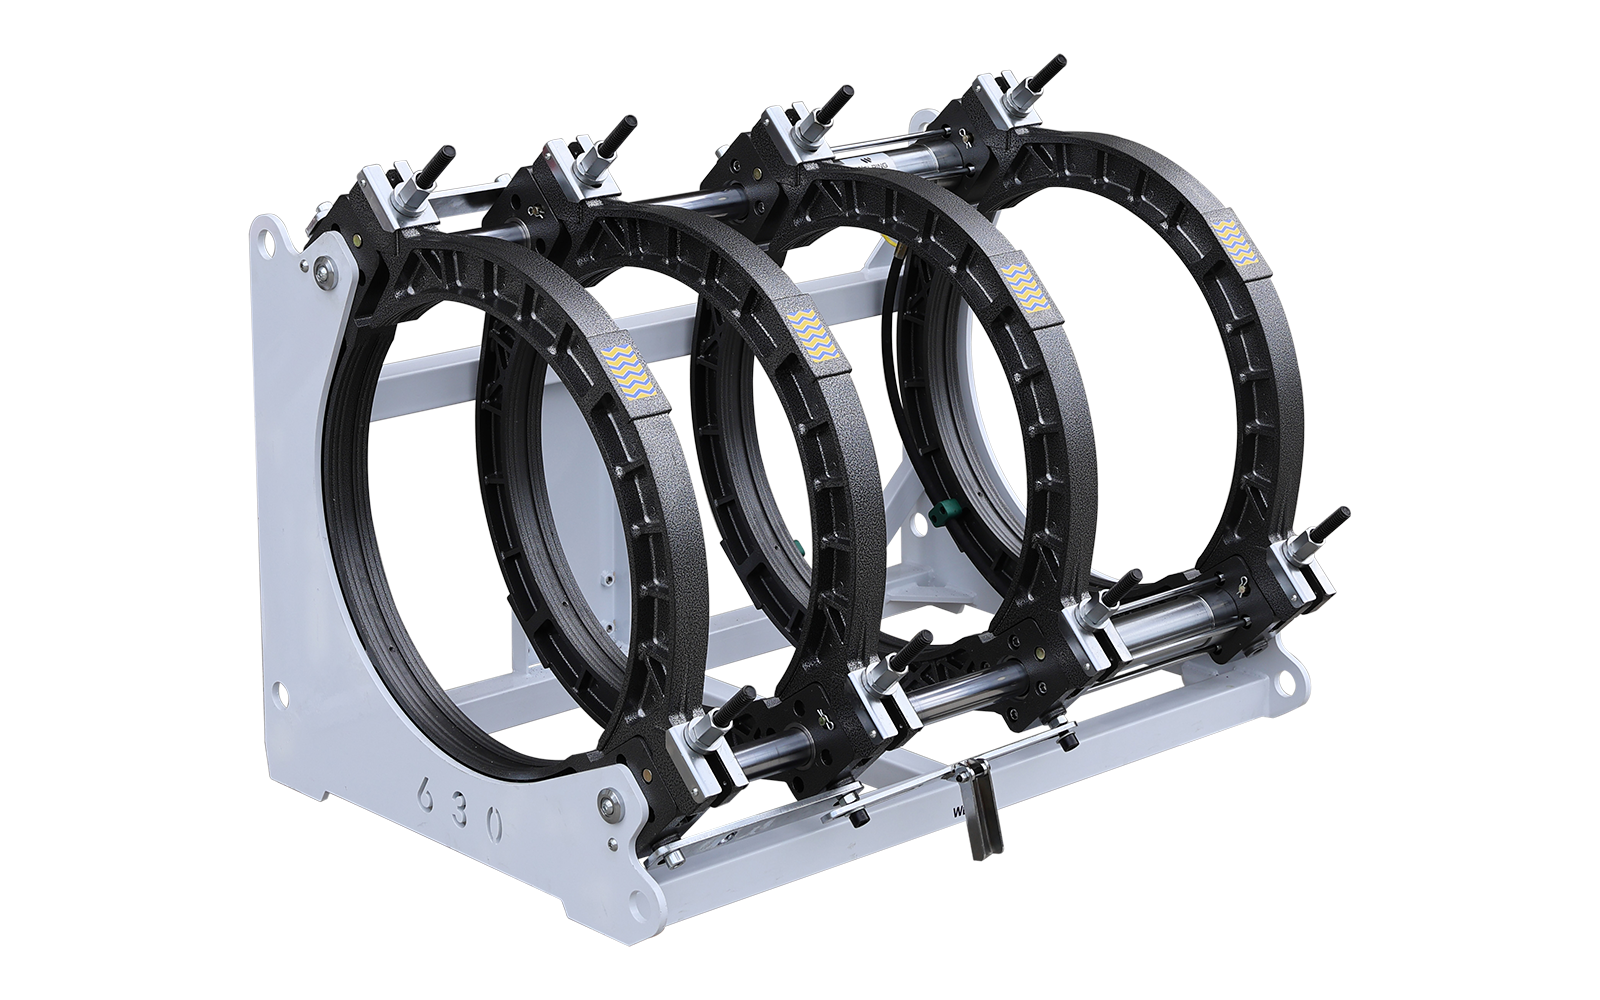
Hydraulic butt fusion machines are designed to join thermoplastic pipes such as HDPE, PP, or PVDF. They apply controlled heat and pressure, creating a joint that is as strong as the pipe itself. For beginners, these machines make the process repeatable and safer compared to manual welding methods.
The machine holds two pipe ends in alignment, heats them with a fusion plate, and then presses them together under controlled pressure. This ensures consistent joints and reduces operator error. Beginners benefit because the hydraulic system controls much of the force and timing.
A typical machine includes:
● Clamps: Hold pipes securely to avoid misalignment.
● Facer: Trims pipe ends to create smooth surfaces.
● Heater plate: Provides uniform heat for the fusion process.
● Hydraulic system: Applies precise pressure during welding.
● Control unit: Allows operators to monitor and adjust settings.
Each part plays a vital role. If the clamps fail to hold, the weld can leak. If the heater plate is not at the correct temperature, the joint may weaken.
● Manual machines: Require operator strength and judgment. They are cheaper but less consistent.
● Semi-automatic machines: Use hydraulics for pressure but still need manual setup. They are common in medium-scale projects.
● Fully automated machines: Control pressure, timing, and temperature digitally. They often feature data logging for quality assurance and are preferred for large infrastructure jobs.
For beginners, semi-automatic models balance cost and ease of use. Fully automated options, while more expensive, reduce human error and improve weld quality.
Hydraulic butt fusion machines improve safety because they minimize direct contact with heated parts. The hydraulic system ensures stable force, reducing the chance of joint failure. They also make welds more uniform, which is critical in industries such as gas distribution and water supply.
Machine Type | Control Method | Best Use Case | Quality Level |
Manual | Operator-driven | Small jobs, repairs | Variable |
Semi-Automatic | Hydraulic assist | Mid-size projects | Consistent |
Fully Automated | Digital + hydraulic | Large infrastructure | High |
Before using hydraulic butt fusion machines, beginners must focus on preparation. A safe workspace and clean pipe ends are just as important as the machine settings. This step sets the foundation for strong and reliable joints.
Choose a work area that is flat, stable, and free of clutter. Good lighting helps operators see alignment clearly, while proper ventilation removes heat and fumes. Outdoors, avoid welding in strong winds or rain, since weather can disrupt heating and cooling. If working indoors, make sure airflow is steady to reduce risks from smoke and overheating.
Strong welds start with clean pipe surfaces. Wipe away dust, oil, and debris using a lint-free cloth. Do not use abrasive tools that can damage the surface. For HDPE pipes, shaving with a facer creates smooth, square ends ready for fusion. Even small amounts of dirt can compromise the weld and shorten its service life. Beginners should repeat cleaning if alignment adjustments are needed.
Personal protective equipment is not optional—it is essential. Gloves protect hands from sharp edges and heat. Safety glasses shield eyes from plastic shavings during facing. Sturdy boots prevent slips and foot injuries. In some cases, welding masks or ear protection may also be necessary. By wearing the right PPE, beginners reduce risks while learning the basics of hydraulic fusion.
PPE Item | Purpose | When to Use |
Gloves | Protect hands from cuts/heat | Facing, heating, joining |
Safety Glasses | Prevent eye injuries | Facing, cleaning |
Welding Mask | Shield face from sparks/heat | Heating phase |
Sturdy Boots | Improve grip and foot safety | Entire process |
Ear Protection | Reduce noise exposure | Long welding sessions |
Proper setup is the first step toward a strong weld. Beginners using hydraulic butt fusion machines must pay close attention here. A small mistake in mounting, alignment, or calibration can weaken the final joint.
Start by placing both pipe ends into the machine’s clamps. The clamps keep the pipes steady while preventing unwanted movement. Make sure the pipe ends extend evenly into the carriage. Uneven mounting can create pressure differences and result in poor fusion. Beginners should always double-check clamp tightness before moving forward.
Once clamped, check that both pipe ends align perfectly. Even minor misalignment can cause stress points or leaks after cooling. Adjust clamps by tightening the high side down until the joint is smooth. If necessary, repeat the facing process after adjustments. Remember: the closer the fit, the stronger the bond.
Hydraulic systems control the pressure applied during fusion. Incorrect settings can lead to bead defects or incomplete bonding. Verify the machine's calibration using its gauge or digital control system. Ensure the hydraulic pressure matches the recommended value for the pipe size and wall thickness. For beginners, consulting the manufacturer's pressure chart prevents guesswork.
Task | Why It Matters | What to Check |
Clamp pipes securely | Prevents slipping | Even extension, tight grip |
Align pipe ends | Ensures smooth weld | No visible gaps or offsets |
Calibrate hydraulic system | Provides correct pressure | Gauge or digital reading |
Confirm safety conditions | Reduces risk during welding | PPE, stable environment |
Note: Incorrect alignment or pressure is one of the top causes of weld failure; beginners should repeat checks until confident.
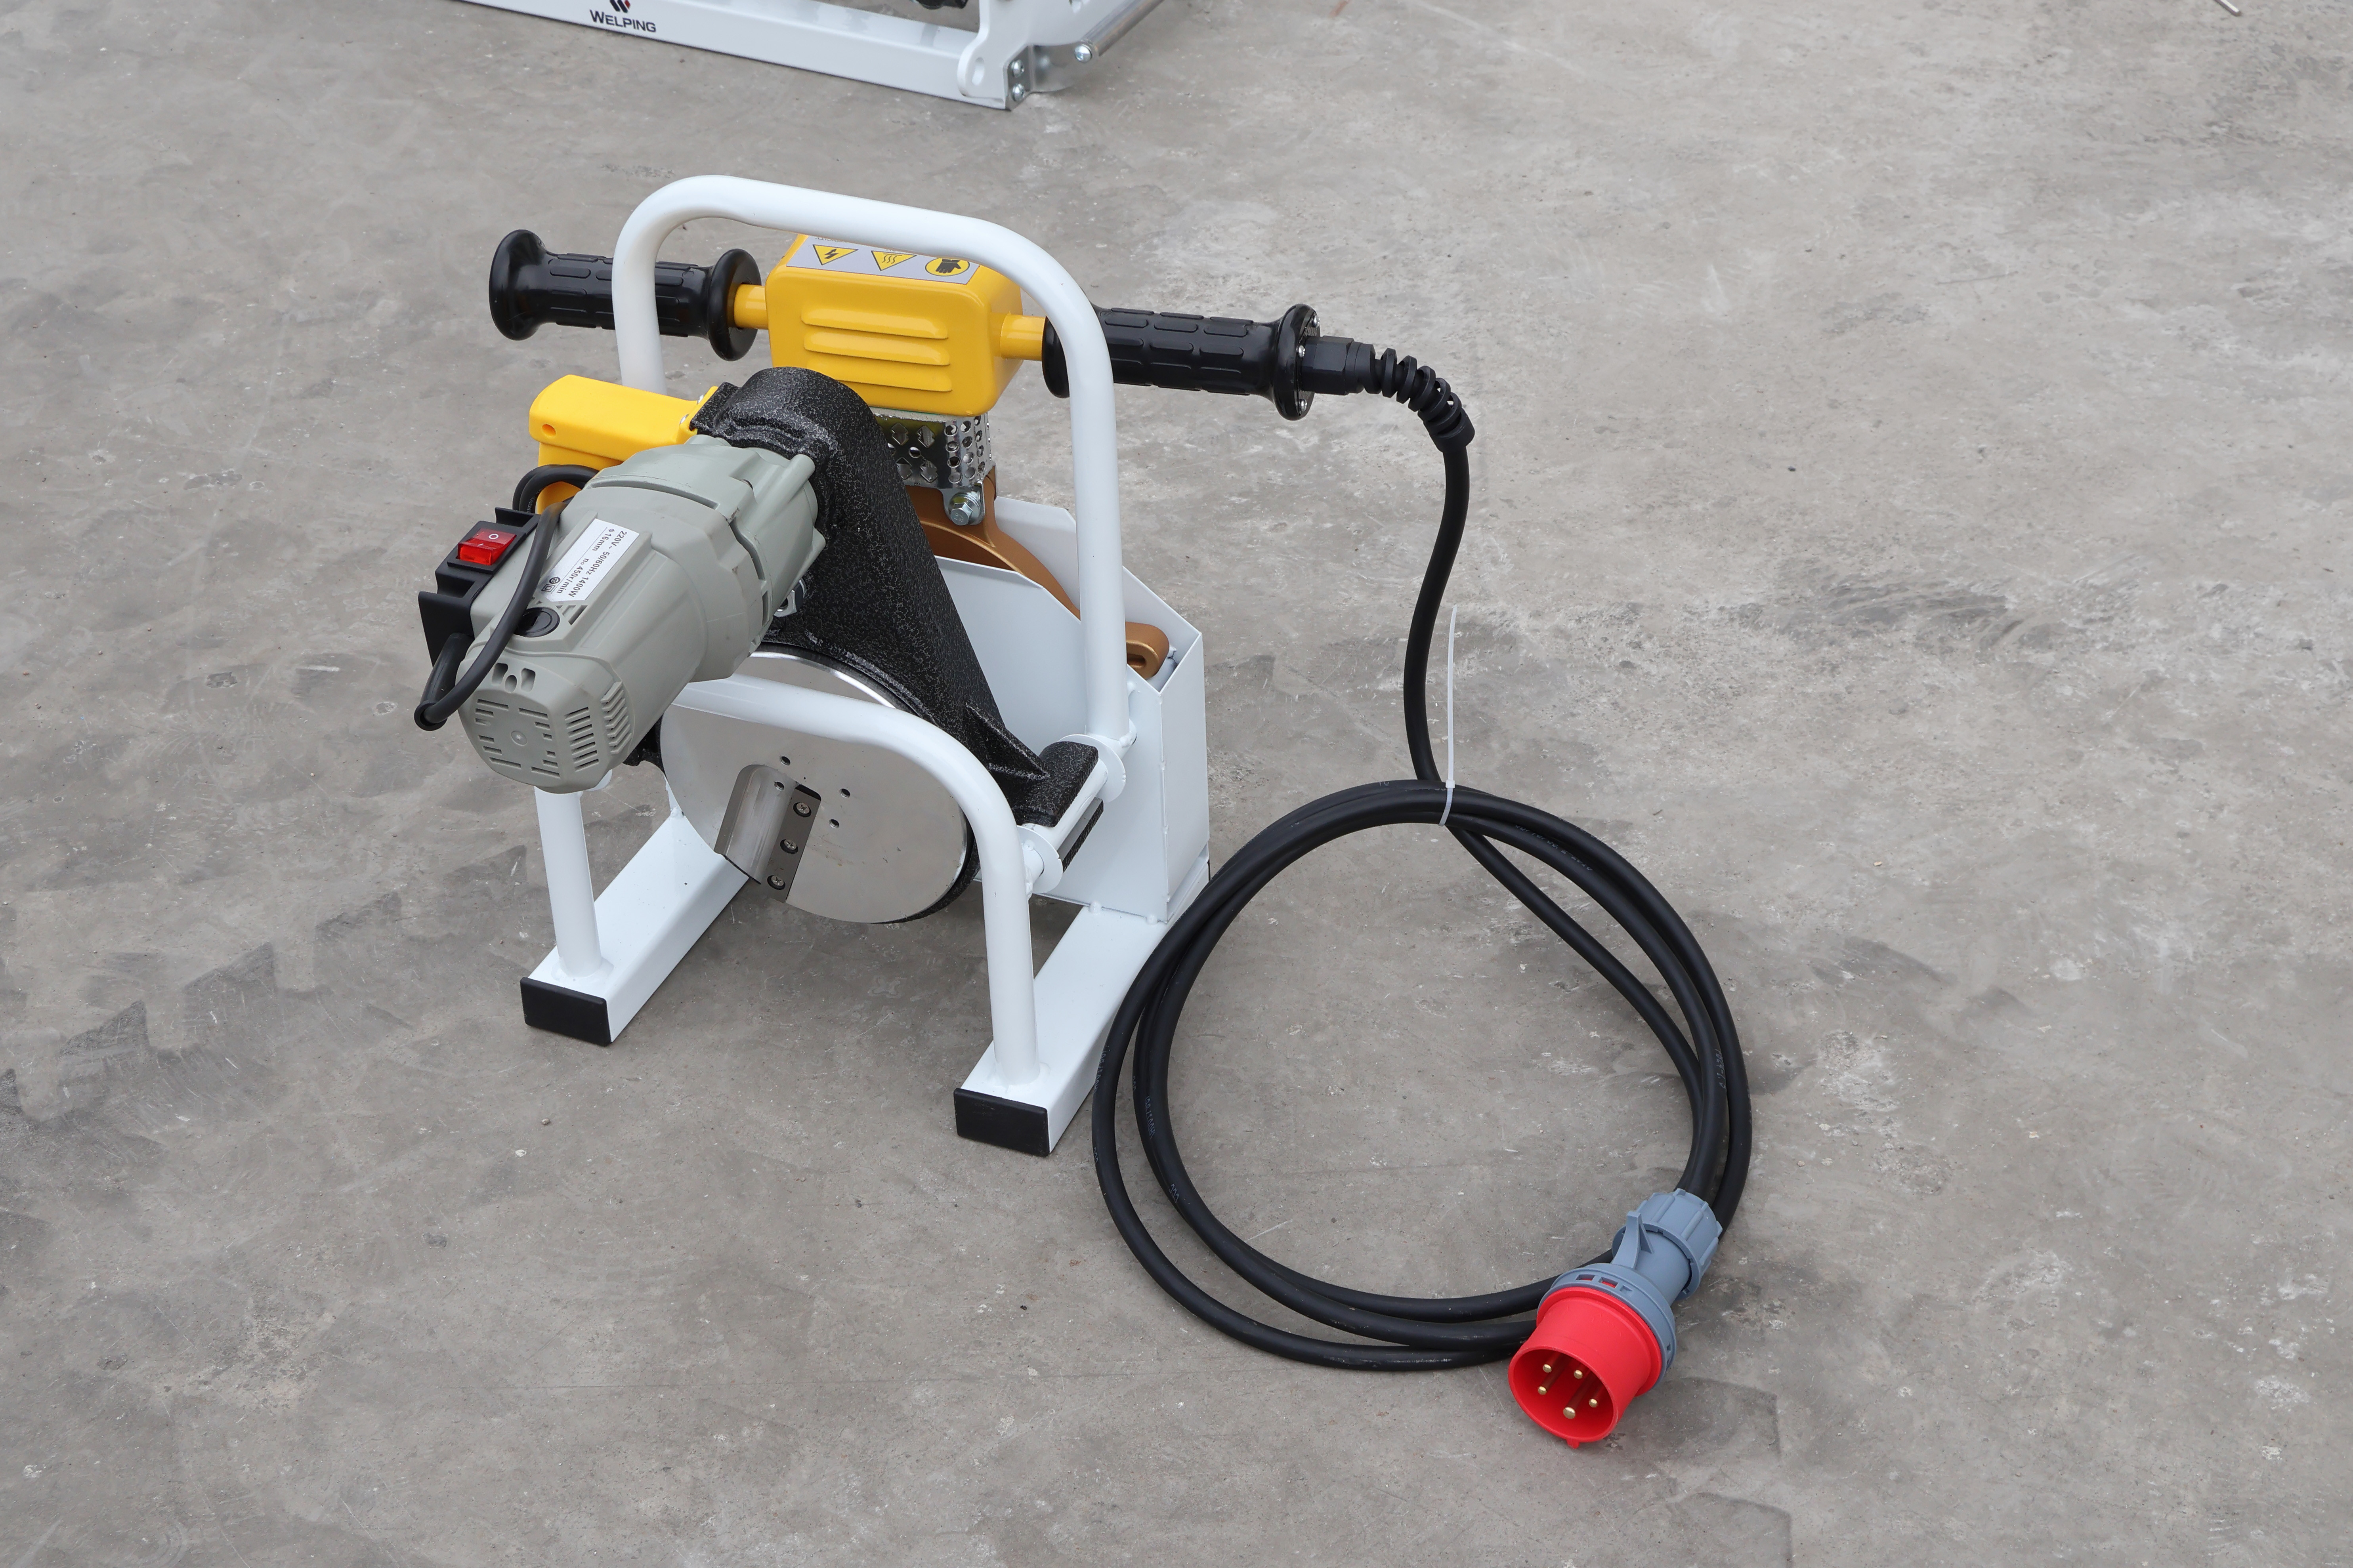
Facing is one of the most critical steps in butt fusion welding. Before heat is applied, both pipe ends must be perfectly smooth and parallel. Beginners often underestimate this stage, but without it, even hydraulic butt fusion machines cannot produce a reliable joint.
The goal of facing is to remove oxidation, dirt, and uneven edges. This exposes a fresh, virgin surface on both pipes. When the heater plate later applies heat, these clean surfaces melt and bond seamlessly. If facing is skipped or poorly done, the joint may fail under pressure.
Hydraulic butt fusion machines use a rotating facer placed between the pipe ends. When activated, the tool shaves off thin ribbons of plastic until the surfaces are flat and aligned. Operators know the process is complete when continuous, even shavings appear and the tool makes uniform contact. Some modern machines stop automatically when facing is finished, giving beginners added confidence.
After facing, remove the tool and clear away plastic ribbons. Loose shavings left in the weld zone can create weak spots or leaks. Do not touch the freshly faced ends with bare hands, since oils or debris can contaminate the joint. Beginners should use a clean, lint-free cloth or compressed air for safe cleaning.
Heating is the stage where pipe ends soften and prepare for bonding. Even beginners using hydraulic butt fusion machines must understand temperature and timing. Without proper heating, the joint may weaken or fail during service.
Most fusion plates operate between 170–250°C (338–482°F). This range ensures the pipe ends melt evenly without burning. Operators should always confirm the actual plate surface temperature with a pyrometer, not just rely on internal gauges. An overheated plate can char the surface, while a cooler plate may not melt the pipe enough for fusion.
The heat soak period depends on pipe diameter and wall thickness. Larger or thicker pipes need longer exposure to allow the heat to penetrate fully. A general rule is about 10–12 seconds per millimeter of wall thickness (needs verification). Beginners should always check the manufacturer’s chart for exact values. Rushing this step leaves the joint brittle, while excessive heating causes bead deformation.
Beginners often push pipes too hard against the plate, which squeezes out molten material and weakens the bond. Another common error is removing the heater too slowly, which allows the surfaces to cool unevenly. Touching the melted ends before fusion is another mistake that contaminates the joint. Consistent checks and steady hands help prevent these issues.
Heating is where the real transformation begins. When using hydraulic butt fusion machines, beginners must focus on precision—temperature, timing, and handling directly decide weld strength.
The fusion plate should stay between 170–250°C (338–482°F). This range is high enough to melt pipe surfaces but not so hot that it burns them. Always confirm the surface temperature with a pyrometer rather than relying only on internal gauges. Too low, and the pipes won’t fuse; too high, and the material can degrade.
Heat soak is the period during which pipes remain pressed against the fusion plate. The time depends on both diameter and wall thickness. Thicker pipes require longer heating so that the melt penetrates evenly. A common rule is several seconds per millimeter of thickness (exact times vary by standards and should be checked in charts). Cutting this step short can result in weak joints; extending it too long can flatten the bead.
New operators often apply too much force, pushing molten material out of the joint. Others remove the plate too slowly, allowing the surface to cool unevenly. Some even touch the softened ends, contaminating them with dirt or oils. Each mistake reduces weld quality. Careful attention and patience prevent these errors.
Joining is the decisive stage of butt fusion. After heating, the softened pipe ends must be joined quickly and precisely. Beginners using hydraulic butt fusion machines should focus on speed, pressure, and bead quality to ensure durable results.
As soon as the heat soak ends, release the clamps slightly and remove the plate. This motion should be smooth and fast, since delays allow the surfaces to cool unevenly. Avoid touching the molten ends or dropping the plate against them. Safe handling at this point prevents contamination and preserves the melt layer needed for fusion.
The hydraulic system applies pressure to bring the molten ends together. Too little pressure leaves gaps, while too much pressure squeezes out molten material. Beginners should rely on the machine’s gauge or digital system to match the recommended value for the pipe size and thickness. The key is steady force until the bead forms uniformly around the joint.
A quality weld is marked by a rounded “double bead” along the joint. The bead should be even, continuous, and symmetrical. Uneven or flat beads often indicate poor heating or incorrect pressure. Beginners should always inspect this bead before unclamping. It is the most visible sign that the weld will hold under long-term stress.
Cooling is the stage where molten plastic transforms into a durable, solid joint. Beginners often overlook it, but proper cooling is just as critical as heating. Even when using hydraulic butt fusion machines, rushing this step can undo all previous effort.
During cooling, the melted pipe ends crystallize and lock together. If the joint is disturbed too early, stress lines or cracks may form. A rule of thumb is to maintain pressure for at least several minutes per inch of wall thickness (exact times vary by standards). Shortcuts here create hidden weaknesses that may cause leaks later.
One advantage of hydraulic butt fusion machines is that they keep pipes clamped firmly during cooling. The clamps prevent any movement or vibration that could shift the molten material. The hydraulic system holds steady pressure until the set time expires, ensuring uniform bonding across the joint. Beginners benefit because the machine does most of the stabilizing work automatically.
Operators should never guess when a joint is ready. Visual and tactile checks help confirm solidification. The bead should appear firm and symmetrical, with no glossy or tacky surface. The joint should feel cool to the touch before unclamping. For larger pipes, additional time is often needed, especially in hot or cold environments.
Step | Best Practice | Why It Matters |
Keep clamps engaged | Maintain pressure until cool | Prevents joint movement |
Follow cooling time charts | Adjust for size and wall thickness | Ensures full solidification |
Inspect weld bead | Look for firm, matte appearance | Confirms cooling complete |
Test by touch | Wait until joint feels cool | Safe to unclamp |
Even after the pipes cool, the job is not complete. Beginners must confirm that the joint is strong and reliable. Using hydraulic butt fusion machines makes quality easier to achieve, but inspection and good practices remain critical.
A good weld shows a smooth, rounded double bead around the joint. The bead should be uniform in thickness and consistent around the entire pipe. A weak weld often looks uneven, flat, or lopsided. Gaps or sharp ridges are warning signs that the fusion did not bond correctly. Beginners should practice identifying these features until they become second nature.
New operators often rush through the process or skip key steps:
● Misalignment: Pipes not clamped straight, leading to uneven beads.
● Poor cleaning: Dirt or oil on pipe ends, creating weak spots.
● Rushing cooling: Unclamping too early, which stresses the joint.
Each mistake reduces weld strength and may lead to early failure. Taking time to repeat checks at each step prevents costly rework.
Modern hydraulic butt fusion machines often include digital controls and data loggers. These systems track temperature, pressure, and time during welding. Automated feedback ensures beginners follow the correct procedure and helps supervisors verify weld integrity. In B2B projects, logged data can be stored.
Even skilled operators face challenges during fusion. Beginners must learn not only how to weld but also how to identify problems early. Hydraulic butt fusion machines are designed to reduce errors, but proper care and troubleshooting still matter.
Common issues include porosity, underfill, and uneven beads.
● Porosity: Small holes caused by contamination or moisture. Fix it by cleaning pipe ends thoroughly before heating.
● Underfill: Bead sits below the pipe surface. Prevent this by applying correct pressure and following soak times.
● Uneven bead: Often the result of misalignment. Re-check clamps and alignment before welding.
Inspecting the bead immediately after cooling helps beginners decide if the weld is acceptable or needs to be cut out and redone.
Regular cleaning ensures consistent results. The heater plate should be wiped with a non-synthetic cloth after each use to avoid buildup. The facer must stay sharp and free of shavings. Clamps should be checked for debris that might affect alignment. By keeping each part in good condition, the machine performs more reliably.
Storing hydraulic butt fusion machines correctly extends their life. Keep them in a dry, cool place away from direct sunlight. Routine checks should include inspecting cables, hydraulic lines, and pressure gauges. Documenting maintenance in a logbook helps track issues before they lead to costly downtime.
Safety and skill development are as vital as welding itself. Beginners must approach hydraulic butt fusion machines with patience and the right guidance.
New operators should train under supervision before handling projects alone. Certification programs provide hands-on practice, safety instruction, and quality standards. With structured training, beginners learn correct pressure, timing, and inspection techniques.
If the machine overheats or malfunctions, stop welding immediately. Shut off power, release hydraulic pressure safely, and allow the heater to cool. Never attempt repairs without proper knowledge. Always keep a fire extinguisher and first aid kit nearby.
Confidence comes from repetition and feedback. Beginners should start with small-diameter pipes before moving to larger projects. Modern hydraulic butt fusion machines, especially automated models, help build trust by guiding operators through each step and recording weld data.
This guide explained the step-by-step workflow of hydraulic butt fusion welding, stressing safety, patience, and correct machine settings. With proper training and reliable hydraulic butt fusion machines, beginners can achieve durable welds. Welping offers advanced solutions with precise controls and dependable performance, helping users simplify welding and ensure long-term reliability.
A: Hydraulic butt fusion machines join thermoplastic pipes using heat and pressure for strong, leak-free joints.
A: Beginners should practice under supervision, clean pipe ends, and follow proper temperature and pressure charts.
A: Proper cooling prevents cracks and ensures the joint is as strong as the pipe itself.
A: Misalignment, poor cleaning, rushing cooling, or using incorrect pressure on hydraulic butt fusion machines.
A: Yes, automated models provide data logging and reduce human error, improving weld consistency and quality.


