

Views: 0 Author: Site Editor Publish Time: 2025-07-05 Origin: Site


You need strong plastic pipe joints for your irrigation system to work well. Plastic butt welding makes a tight and leak-proof joint. This joint can handle the hard work of irrigation. When you use plastic pipes, you want connections that do not leak. This helps your irrigation system run without stopping. Plastic pipes do not rust and can handle water pressure. Pick plastic because it lasts long and is easy to install.

Plastic butt welding makes strong joints that do not leak. This helps irrigation systems work well and saves water.
Use the right tools like the WELPING WP160A machine. It controls heat and pressure for good welds every time.
Always get pipes ready by cleaning and lining them up. Heat, fuse, cool, and check them to make sure joints are strong.
Follow safety rules by wearing gloves and glasses. Keep air moving and take care of your tools to stop accidents.
Get good training and follow best steps to avoid mistakes. This helps you make plastic pipe connections that last and work well.
Plastic butt welding joins plastic pipes in many poly piping systems. This method uses heat and pressure to stick pipe ends together. First, you line up the pipe ends. Then you heat them until they get soft. Next, you push the ends together. This makes a strong joint with no gaps. You can use this for PE, HDPE, and PP pipes. It works in farms and factories.
The process needs you to watch a few things. You must set the right heat, time, and force. These things change how good the weld is. Experts check the heat with special tools like thermal analysis and infrared imaging. They also use math models to find the best settings. This saves pipe and makes sure each joint is strong. The joints are as strong as the pipe. This is important for water and irrigation jobs.
Plastic butt welding has many good points for irrigation systems. You get strong, leak-free, and tough pipe joints. These joints help stop water loss and make your system work better. HDPE pipes joined this way last long and take high pressure.
Here are some main benefits:
You get smooth joints that are as strong as the pipe.
Butt welding is best for big pipes and high-pressure systems in irrigation.
You get tight joints that stop leaks and keep water flowing.
This method helps meet the need for strong water systems in irrigation.
Pick butt welding when you want strong, lasting pipe joints. This way, you build good farm irrigation systems that work every day.
You need the right tools to make strong pipe joints. The WELPING WP160A hydraulic butt welding machine is a great pick for irrigation jobs. This machine works with PE, HDPE, and PP pipes from 63mm to 160mm. It has a strong frame, a sharp planing tool, and a heater that works well. These parts help you get the same good weld every time. The machine uses a hydraulic station. This gives steady pressure and lets you control the weld. This is important for poly welding.
Here is a table that lists the main technical details of the WP160A butt welding machine:
| Specification | Details |
|---|---|
| Model | WP160A |
| Welding Range (mm) | 63-160 |
| Applicable Materials | PE, PP, PVDF |
| Power Supply | 220V, 50Hz |
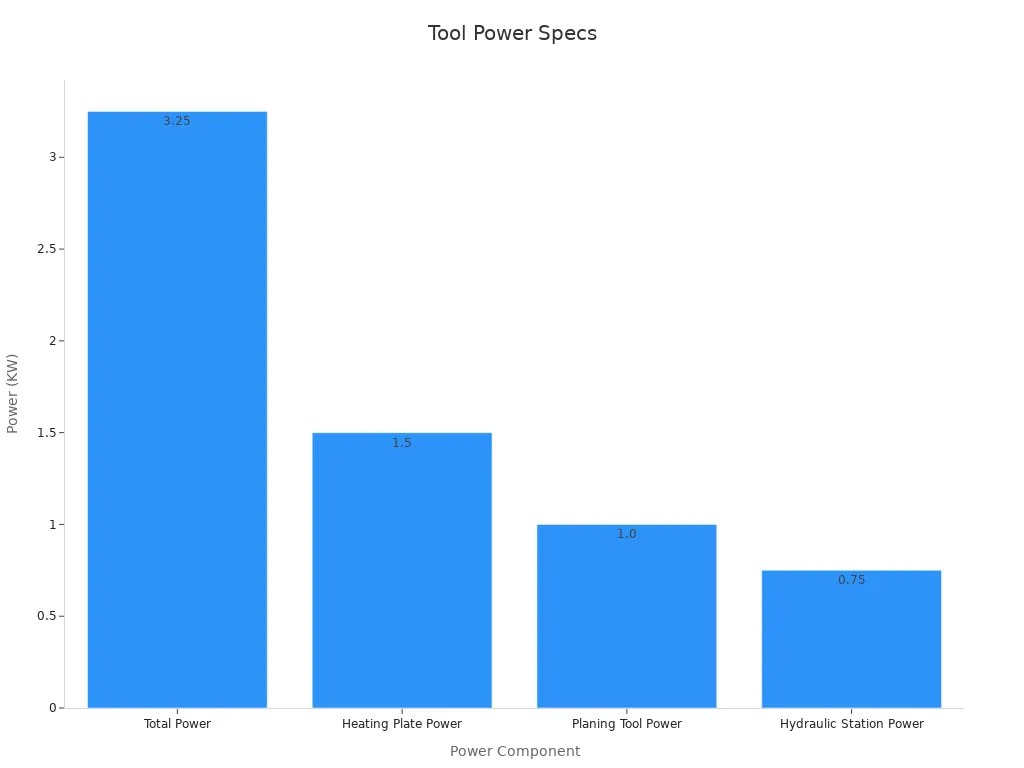
| Total Power | 3.35 KW |
| Heating Plate Power | 1.5 KW |
| Planing Tool Power | 1.1 KW |
| Hydraulic Station Power | 0.75 KW |
| Max Heating Plate Temp | 270ºC |
| Temperature Deviation | ±5ºC |
| Pressure Adjusting Range | 0-6.3 MPa |
| Weight (Net) | 99 kg |
The WP160A has a heating plate with Teflon coating. It also has a strong copper motor and a control panel that is easy to use. These features help you weld plastic pipes well and stop leaks. The machine can also keep records of each weld. This helps you check the quality of your work.
Tip: Good machines like the WP160A can lower mistakes by up to 85%. This is because it is very accurate and keeps the right temperature.
You can use this machine for many kinds of plastic pipes. It works for irrigation, water supply, and other piping jobs. The machine saves energy and does not need much fixing. This makes it a smart choice for big and small projects.
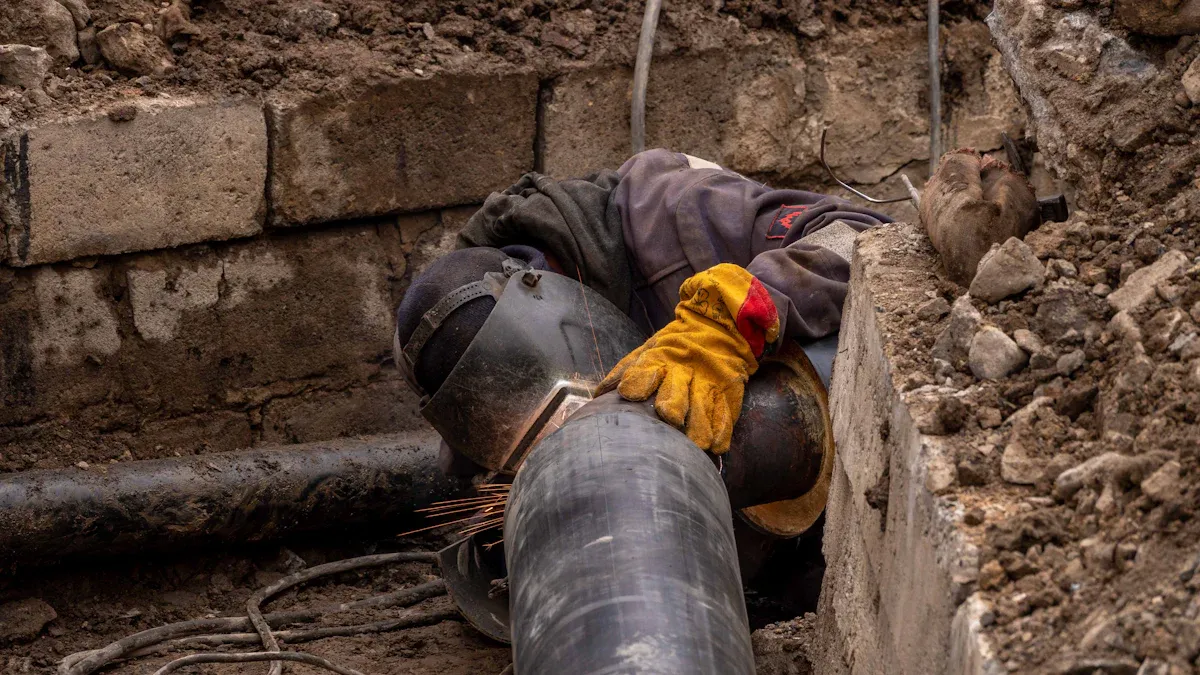
When you use a butt welding machine, safety is very important. Always wear gloves and safety glasses. These protect your hands and eyes from burns and splashes. Make sure the area has good airflow. This keeps you from breathing in bad fumes when welding. Keep your tools in good shape to stop accidents and help you work better.
Gloves and safety glasses keep you safe from heat and flying bits.
Good airflow helps you avoid breathing in fumes.
Taking care of your tools keeps your work area safe.
If you follow these safety tips, you keep yourself and others safe when working with plastic pipes and butt welding machines.
Get your pipes and workspace ready first. Wipe the pipe ends with a clean cloth to take off dirt or oil. Cut the pipe ends so they are flat and smooth. Use the WELPING WP160A to hold the pipes tight. Follow the ASME/ANSI B16.25 rules for pipe ends. These rules tell you how to shape and check the pipe ends. Good prep stops problems and makes the joint strong.
Tip: Always look at your tools and make sure everything lines up before you start. This helps you stop mistakes like bad joints or uneven pipes.
Keep records and use tests like bend testing to check your work. These steps help you get ready for a good plastic butt welding job.
Put the pipes in the machine’s holder. The WELPING WP160A uses hydraulics to keep pipes still. Make sure the pipe ends touch with no gaps. Good alignment is needed for a strong weld. Use the control panel to set pressure and check by looking. If pipes are not straight, the joint can break.
Put pipes in the clamps.
Adjust until the ends match up.
Lock the clamps so pipes do not move.
Good alignment spreads heat and pressure evenly in the next steps.
Set the heating plate to the right temperature for your pipe. For HDPE pipes, use 230°C. Put the heating plate between the pipe ends. Push the pipes gently to the plate. Hold them there for about 100 seconds. Watch the temperature and time on the control panel.
Tests show the best weld comes from the right heat and time. Too much heat or too little time makes weak joints. Careful heating is important for strong plastic welds.
Note: Always use the machine’s controls to keep the right temperature. This stops the pipes from getting too hot or too cold.
After heating, take out the plate fast. Push the pipe ends together with the hydraulic system. Use the right pressure—2.5 MPa for HDPE pipes. Keep the pressure steady so the melted plastic sticks well. The WELPING WP160A keeps the pressure even for a good melt zone.
| Fusion Metric | Standard Weld | Cold Weld | Over Weld |
|---|---|---|---|
| Fusion Zone Width (mm) | ~1.4 | ~1.4 | ~5.2 |
| Max Peel Force (N) | 2828.52 | 1806.47 | 1360.76 |
| Crystallinity (%) | 57.26 | 55.59 | 48.52 |
Standard welds are even and strong. Cold or over-welded joints have problems and are weaker. Use the controls to keep fusion time and pressure right. This step is key for good poly welding.
Keep the pipes clamped while they cool down. Do not move the joint during this time. Cooling rules, like ISO 16834:2012, help keep the joint strong. Cooling time depends on pipe size and material. If cooling takes too long, the pipe can get weaker. Yield strength can drop by 17% if cooling is too slow.
Tip: Use the cooling time from the pipe maker or the machine’s guide. This keeps the joint strong and stops it from getting soft.
Good cooling keeps your plastic butt weld strong and long-lasting.
Check the joint after it cools. Look for problems like cracks, holes, or burns. The weld bead should be smooth and even. Use tests like ultrasonic testing to find hidden problems inside. For important joints, do pull or bend tests to check strength.
Look at the weld for surface problems.
Ultrasonic testing finds inside cracks or holes.
Pull and bend tests check how strong and bendy the weld is.
These checks help you make sure your butt weld is good. Good inspection keeps your irrigation system safe and leak-free.
Keep your workspace and pipes clean when you do plastic butt welding. If there is dirt, oil, or grease on the pipes, the weld can be weak. Rules like AWS D1.1 and ISO 3834 say you must check and clean the pipe before welding. If you do not clean, you might get holes or bad joints.
Take off all loose dirt from the pipe ends.
Pick the right cleaner for your pipe.
Make sure the pipe is dry before welding.
| Material | Recommended Cleaning Agent |
|---|---|
| Aluminum | Mild detergent or alkaline cleaner |
| Steel | Solvent-based or acidic cleaner |
| Titanium | Mild detergent or alkaline cleaner |
After cleaning, you can roughen the pipe if needed. This helps the plastic stick better and makes a smooth joint. Machines can help you find dirt early, so your joints stay strong and do not leak.
You must watch the temperature when you do butt welding. The right heat helps the plastic pipes join well and stay strong. Studies show that changing the heat changes how strong the weld is. Use your machine to set the best temperature for your pipe.
How the heat goes up and down during welding changes the weld. If you keep the heat steady, you stop weak spots and cracks. Heating before and cooling after welding helps lower stress in the joint. Watching and changing the heat as you work gives you the best welds.
Good training is very important for plastic butt welding. Skilled workers know how to use the machine, line up pipes, and check the joints. New tools like VR and AR help you learn faster and make fewer mistakes. These tools help you weld better and feel more sure.
You should practice with real and virtual tools. Training programs test your welds for strength and safety. When you keep learning new skills, you help your team make safe and strong plastic joints every time.
You can make some common mistakes when doing plastic butt welding. These mistakes might cause weak joints or make the machine stop working. If you spot these problems early, you can fix them before they hurt your irrigation system.
Here is a table that shows usual problems, what they look like, and what to check:
| Common Issue Category | Symptoms / Fault Description | Suggested Checks or Repairs |
|---|---|---|
| Hydraulic System Pressure Failures | No system pressure even though the motor runs | Check pressure relief valve, oil level, oil pump coupling, filter blockage, pressure gauge, motor rotation |
| Milling Cutter Malfunctions | Cutter does not rotate or cuts poorly | Adjust cutting pressure, blade height, replace or sharpen blade, ensure continuous chip production |
| Heating Plate Problems | Heating plate does not heat properly | Check connections, temperature controller, sensor resistance, heating tube insulation, wiring |
| Power and Motor Failures | Machine or oil pump does not work | Verify power cord, neutral line, motor capacitor, proximity switch, contactor status |
| Pressure Holding Failures in Fusion Frame | Frame cannot hold pressure or moves unevenly | Inspect pressure relief valve, oil level, joint leaks, sealing ring, oil cylinder condition |
You might also see welding problems like cracks, porosity, or lack of fusion. These problems often happen if you do not clean well, use too little heat, or weld the wrong way. Skipping cleaning or using bad settings makes these issues more likely.
You can fix most welding problems by following simple steps and good habits. Here are things you should do:
1. Train and certify all workers. Skilled people make fewer mistakes.
2. Clean and degrease pipe ends before welding. This stops dirt from causing trouble.
3. Make sure joints fit together the right way. Good setup makes strong welds.
4. Preheat thick pipes if needed. This helps stop cracks from forming.
5. Keep your work area safe from wind and dirt. A clean space helps welding go well.
6. Take care of your machines. Check and adjust them often so they work right.
7. Look at every weld. Use your eyes and special tests to find hidden problems.
8. Follow rules like AWS or ISO. These rules help you get good results every time.
Tip: If you see porosity, check how you clean and shield the weld. For cracks, control the heat and use the right filler. If there is no fusion, change your welding settings and check the joint fit.
If you use these solutions, your welds will be better and your irrigation system will last longer.
If you follow each step, you can make strong plastic joints that do not leak in your irrigation system. Plastic butt welding makes tough connections. These connections keep water moving and help your system last a long time. Using good machines like the WELPING WP160A lets you control pressure and temperature for every weld. When you use best practices and keep learning about plastic welding, you build safer and better irrigation systems. These systems work well even when things get hard.
You should match the pipe size to your irrigation needs. The WELPING WP160A works with pipes from 63mm to 160mm. Always check your system’s flow requirements before you select a pipe.
Yes, you can use the WP160A for PE, HDPE, and PP pipes. The machine’s design supports these materials. You get strong, reliable joints every time.
First, inspect the joint for cracks or gaps. Clean the area and check your welding settings. If needed, cut out the faulty section and repeat the welding process.
You should let the joint cool completely while it stays clamped. Cooling times depend on pipe size, but most joints need at least 10–15 minutes. Always follow the machine’s guide.
You should get proper training before using the WP160A. Training helps you avoid mistakes and ensures safe, strong welds. Many suppliers offer hands-on or online courses.


